Captain Survival Guide #1
This post is a guide in the sense that it contains the most crucial implementations and gives the players hints in case they get lost. It also contains some curiosities regarding the different quests backgrounds. If you have any questions just check the corresponding section of this guide. Happy reading.
Map
We have a big map divided into 4 zones. These zones are locked and if you try to enter one, instead of bumping into an invisible wall (yeah, they have those in space), you will receive a 5 second warning to re-enter the unlocked zone. Disrespect the warning and it’s GameOver.
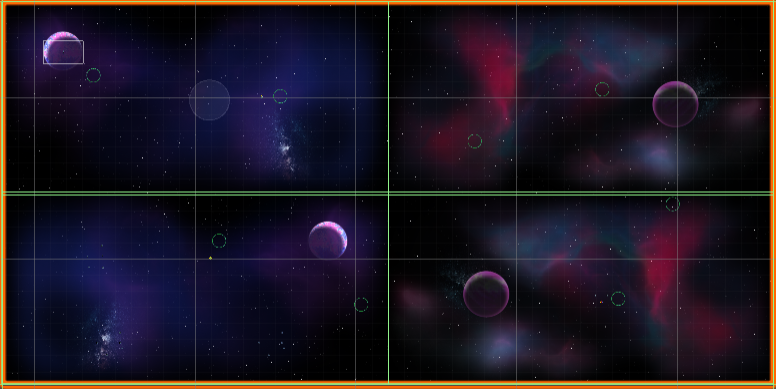
You start in the NW zone (top-left) which has a quest giver that will unlock the next area after you completed its quest. The order of unlocking is NW > SW > SE > NE.
Checkpoint Zones
Green rings that save your location, resources, experience and build. When you click SAVE the game creates a binary file with all this information. When you save, you are not saving the world state, which means that the enemies and asteroids you destroyed, the quest items you collected will still be destroyed and collected.
You want to save as often as you can because for one you get your HP restored and for two if you need to leave the game the next time you play and choose ‘Continue’ on the MainMenu you will be loaded in that green circle. Note that if you die to enemies, you will be loaded with no Build State. If you come back without a certain number of crystals you are given enough resources to build 2 thrusters and 1 weapon.
Enemies
Enemies are spawned in manually placed Zones. These zones spawn a given number of specific enemies and then disable them. A Zone is composed of two colliders: the small/interior one which contains the disabled enemies and a big/outer that checks if the player is inside it. When the player enters the outer collider the enemies are activated which make them check for the player position on each frame. If the player comes near their sight radius that individual enemy will engage in aggressive behaviour. This aggressive behaviour changes from enemy to enemy:
- DeathStar (simple shooter): chases the player while shooting every 1 second. If they are 8 units away from the player they stop moving and shoot from there. If the player then starts moving towards the enemy, reaching 6 units of distance, it will retrieve in the opposite direction in order to keep a “safe distance”.
- Tracer (Teleporting Triple Shooter): they teleport to a random spot inside a radius with the player on the center every 3 seconds and then shoot 3 times towards the player. If the player gets too close, they also retrieve to maintain some distance.

- Kamikaze (self destructing bastard): moves in a sinusoidal movement towards the player until they lose sight radius. These never stop until they stop seeing the player. When they touch one of the modules of the ship it triggers the auto destruction behaviour. In this behaviour the enemy stops for 0.5 seconds and then deal massive damage to everything in a 4 unit radius. It’s nasty how you can lose everything you built in a fraction of a second!
It’s important to note that these enemies will never physically leave the inner zone, except for the kamikaze which can go until the limits of the outer zone. If the player leaves the outer zone the enemies are deactivated (looks like they disappear but actually they are there, waiting for you to re-enter the zone).
Also, in order to give some sense of progression to our game, all zones have a ‘tier’ which boosts the stats of our enemies (damage, movement speed, fire rate, TP cooldown etc.) Tier can be 1 to 3.
Build Menu

If we had time we would implement a tooltip functionality, enabling the hovering of the elements on the build menu showing their names and description. The list of elements on the left::
- 3 resource types (red - rarer, green and yellow crystals)
- Max Modules you can build = Level x 2 + 6. (“3/6”) means you have 3 of a maximum of 6 modules.
- Max Thrusters you can build. (“2/5”) means you can build up to 5 thrusters and currently have 2. You can build Energy T modules to increase in 5 the number of thrusters you can build.
- Max Weapons you can build. (“1/5”) means you can build up to 5 weapons and currently have 1. You can build Energy W modules to increase in 5 the number of weapons you can build.
- Thrust value. Basically is the speed of your ship, which increases with the number of thrusters.
- Mass value. Give the weight of all modules combined.
INFO: Our ship movement speed follows this: AccelerationValue = ThrustValue + Mass/2
You start with only the Thruster and Weapon.